 RSS Feed
 Twitter
 10:21 pm
 Unknown

I decided to make a tutorial on How to scan books and then to upload to internet and let them available for our future use and to everyone. I am myself fond of reading books and that's make me happy when I got any book available online.
I am working on this blog and since one year, I found very easy methods, and discover my own ways on how to gain professional look. I am a student of Software Engineering, so playing around with the tools is my job.
Agenda:
Main focus of my this tutorial would be, How to Convert Book from hard copy to Soft copy.
Listeners:
The level of this Tutorial is Beginner. I am trying to make it easy on order anyone can follow.
You must have a smart phone of very good Camera. 5 Mega Pixel actually works great.
Lets Start it.
Methods:
Beside that conventional scanner, I found two methods to scan books .
- One is by Smart Phone Mobile
- Other is by Camera (Palm, Digital, DSLR etc).
Here in this tutorial I will focus on first, Smart Phone Mobile. The second will I will another tutorial.
-=======Contents=======-
1:- How to Scan Books with help of your Mobile:
Step 1 - Creating Account in CamScanner
Step 2 - Verifying Account
Step 3 - Downloading CamScanner
Step 4 - Registering CamScanner
Step 5 - Scanning Book
Step 6 - Organizing and Editing Book
Step 7 - Finalizing & Exporting Book
2:- How to Scan Books with help of DSLR Camera:
======================
1:- How to Scan Books with help of your Mobile:
I am very happy because in today's market we have a great App available which makes our job really easy. But unfortunately it is paid(5$/month), which is very high price for us. But we can manage one month free subscription. You can follow me along.
First of all you need to click Here, A webpage will open, which looks like this:
(See Fig. 1)
 |
| Fig. 1 |
Enter your Email Address, and Password you like. and press Sign Up Button.
(See Fig. 2)
 |
| Fig. 2 |
Now click on 'Check Email':
(See Fig. 3)
 |
| Fig. 3 |
They are asking you to check your Inbox. Mine looks like this. I received Email from "CamScanner"
(See Fig. 4)
Upon opening and reading Email looks like this:
 |
| Fig. 4 |
Upon opening and reading Email looks like this:
(See Fig. 5)
 |
| Fig. 5 |
(See Fig. 6)
 |
| Fig. 6 |
Now you need to Install CamScanner by selecting your platform (Android, iPhone, iPad, Windows Phone) (See Fig. 7).
Or you can search for app name "CamScanner" in Google Play or in Apply Store. Or you can download APK from official website HERE
When you done with downloading, Your App will looks like this(See Fig. 8). (As I have Huawei Honor 3C H30-U10, with 8MP Autofocus Camera)
 |
| Fig. 7 |
When you done with downloading, Your App will looks like this(See Fig. 8). (As I have Huawei Honor 3C H30-U10, with 8MP Autofocus Camera)
 |
| Fig. 8 |
You may notice the 'Buy App' icon on left bottom of the app. It shows that your app is not registered. You will miss some features, and also in your scanned documents there will be watermark of CamScanner. You can notice it in bellow image.
(See Fig. 9).
Step 4 - Registering CamScanner:
 |
| Fig. 9 |
Step 4 - Registering CamScanner:
To remove this drawback and registered it for one month. We have to sign in to the app.
Click on the Option button on Top Right side of App as shown in (See Fig. 10).
Click on Sign in/Register, as shown bellow:
 |
| Fig. 10 |
Click on Sign in/Register, as shown bellow:
(See Fig. 11).
Now enter your Username and Password, which you entered in Step No 1.
 |
| Fig. 11 |
Now enter your Username and Password, which you entered in Step No 1.
(See Fig. 12) & (See Fig. 2).
Wait for it.
 |
| Fig. 12 |
(See Fig. 13).
 |
| Fig. 13 |
You are successfully signed in to the app.
(See Fig. 14).
You now notice that your app is Registered. You can enjoy one month free premium services.
 |
| Fig. 14 |
(See Fig. 15).
If I got time I will show you on how to extend that one month premium service.
Beside this CamScanner v3.7.1 Full Premium Version can be Download HERE.
Step 5 - Scanning Book:
As we have successfully install and registered our tool. Now lets start the game.
Open CamScanner in your mobile. The screen looks like this:
(See Fig. 16).
Click on Camera Icon as shown bellow:
 |
| Fig. 15 |
Beside this CamScanner v3.7.1 Full Premium Version can be Download HERE.
Step 5 - Scanning Book:
As we have successfully install and registered our tool. Now lets start the game.
Open CamScanner in your mobile. The screen looks like this:
(See Fig. 16).
 |
| Fig. 16 |
Click on Camera Icon as shown bellow:
(See Fig. 17).
Now ready your book. I am scanning Pashto book "Swat Da Sardaro Watan, By Muhammad Perveesh Shaheen (Will be uploaded soon to this blog)".
 |
| Fig. 17 |
(See Fig. 18).
I capture photo of Book cover. If you think you have correct captured photo. So click on YES Tick Mark as shown bellow:
(See Fig. 19).
After clicking Tick Mark. The following stage appear. We have Five different Buttons in (Fig. 20) which as discussed as:
 |
| Fig. 18 |
I capture photo of Book cover. If you think you have correct captured photo. So click on YES Tick Mark as shown bellow:
(See Fig. 19).
 |
| Fig. 19 |
After clicking Tick Mark. The following stage appear. We have Five different Buttons in (Fig. 20) which as discussed as:
Button 1:
If you like the photo and you think the Box covers the book page as a whole. So Click on this YES TICK Mark button. It will pressed further.
Button 2:
This button will rotate you image to Right.
Button 3:
This button will rotate you image to Left.
Button 4:
If you think the box does not cover the whole page so click on this button, this will re-set the box. The box will cover nothing, but a whole screen.
Button 5:
If you think you have captured image, but the image is not right or image is blur etc. So you can go back with this button to camera very easily. This is actually BACK button.
 |
| Fig. 20 |
After Clicking in Button No.1. We get the following screen. Now we have may options as Auto, Original Lighten, Magic Color etc. By default Auto is select, which is great.
(See Fig. 21).
 |
| Fig. 21 |
(See Fig. 22).
To add more picture to this folder, just click on ADD button with camera Icon.
 |
| Fig. 22 |
Now! This process is so hard, that if we capture a photo of pages then we take time to arrange or crop etc. So as this process is so lengthy. CamScanner other feature comes in handy.
CamScanner support two systems for scanning. One as: Single Mood, Other is: Batch Mood.
Batch Mood is a very great feature, you will take picture of pages as many as you want just in a seconds, and just in one click, you then can Edit and Crop it latter.
I have selected Bach Mood as shown bellow:
(See Fig. 23).
As you seen on left bottom of picture of page, there is a small '4'. This represent number of scanned pages. We can scan till the end of the book.
 |
| Fig. 23 |
As you seen on left bottom of picture of page, there is a small '4'. This represent number of scanned pages. We can scan till the end of the book.
(See Fig. 24).
Now when I pressed OK button. we will see bellow page. Of total having 5 pages (1 cover photo)
 |
| Fig. 24 |
Now when I pressed OK button. we will see bellow page. Of total having 5 pages (1 cover photo)
(See Fig. 25).
I just click on page number 2 to check my scan results. Wow its look great as:
 |
| Fig. 25 |
I just click on page number 2 to check my scan results. Wow its look great as:
(See Fig. 26).
 |
| Fig. 26 |
Now lets play with the options given, I suppose we have some problem with our scan, it may have low light, it may have blur, it may have hand etc. I am having my handkerchief on page :p, It occurs problem. So we have to scan that page again. So how can we do that with our interpting our whole book. The disturbed page looks like bellow:
(See Fig. 27).
Ok. So how can we scan this page again. You just have to slide above the screen. As shown in following screenshot:
 |
| Fig. 27 |
Ok. So how can we scan this page again. You just have to slide above the screen. As shown in following screenshot:
(See Fig. 28).
Upon the sliding page to up. We found these new buttons bellow the page. One is to assign page Name, the other is what we were searching for 'Retake'. Click on Retake.
(See Fig. 29).
So by this way we can Retake the picture again.
 |
| Fig. 28 |
Upon the sliding page to up. We found these new buttons bellow the page. One is to assign page Name, the other is what we were searching for 'Retake'. Click on Retake.
(See Fig. 29).
 |
| Fig. 29 |
But sometimes the algorithms of software confuse with the border, it soem times unable to detect the margin of page, as shown bellow:
(See Fig. 30).
So you need to click on those edges (round circles) and drag it to margin of page. As I am dragging it to left to adjusting it to page.
 |
| Fig. 30 |
(See Fig. 31).
If you happy with result, Click on Ok (Tick Mark) button.
 |
| Fig. 31 |
(See Fig. 32).
Step 7 - Finalizing & Exporting Book:
As we are happy with our results. We have edited and inspect all our scanned pages, If we have problem with any page we can use the "Retake" option. And we can use adjust box as I have discussed above.
Now our final Book looks like bellow of having 7 pages.
(See Fig. 33).
This name "New Doc" looks so awkward, Lets change it. By pressing (holding fingure on 'New Doc' for 2 seconds) on 'New Doc' a bunch of options will appear as follow.
(See Fig. 34).
Click on "Rename". Put in TextBox whatever your scanned book name is, as I have entered "Swat Da Sardaro Watan". Click on OK.
 |
| Fig. 32 |
As we are happy with our results. We have edited and inspect all our scanned pages, If we have problem with any page we can use the "Retake" option. And we can use adjust box as I have discussed above.
Now our final Book looks like bellow of having 7 pages.
(See Fig. 33).
 |
| Fig. 33 |
This name "New Doc" looks so awkward, Lets change it. By pressing (holding fingure on 'New Doc' for 2 seconds) on 'New Doc' a bunch of options will appear as follow.
(See Fig. 34).
 |
| Fig. 34 |
(See Fig. 35).
Now Our Book is ready to Share.
 |
| Fig. 35 |
Exporting Book:
By Entering inside our folder, we have some options. Like adding more page (scan) to the book etc.
One options is "Export".
(See Fig. 36).
By Clicking on Export Button, we will get this option. CmScanner offers you to export in PDF, in Images (JPEG Format) or Text. We will not chose .txt. CamScanner have facility to recognize text from images (OCR: Optical Character Recognition). So we can export only text. But As if we are scanning Urdu or Pashto books, so unfortunately we don't have OCR facility for our languages yet.
 |
| Fig. 36 |
But If you are scanning English book. Go ahead it will work for you if you have premium version of software (You already have one month free premium LoL).
So now how to export. I will recommend you always choose PDF Format(Portable Document Format) for exporting and sharing.
(If you want to edit the pages in Photoshop or Gimp later, you then can convert PDF to JPEG, all with same size. A great tip for advance users)
(See Fig. 37).
You can have this option by simply holding your finger on the folder as we do in our previous step (Fig. 34). You will found share option as:
 |
| Fig. 37 |
(See Fig. 38).
 |
| Fig. 38 |
(See Fig. 39).
 |
| Fig. 39 |
(See Fig. 40).
 |
| Fig. 40 |
Now some more tips:
I am having my Huawei Honor 3C H30-U10, with 8MP AutoFocus Camera. If I scan with 8MegaPixel selected. My scanned book will have a very high size. So how how to change it to 5MP. Just follow me.
(See Fig. 41).
Click on Setting Gear Button(1). The slide to right find that Quality option(2), then just select 8MP, or 5MP(3). Whatever you want.
 |
| Fig. 41 |
I have selected 5MegaPixel (2560px x 1920px).
(See Fig. 41).
You have to choose the option, which best suits your needs. No hard and fast rule here.
 |
| Fig. 42 |
One last but not least. Some times we have scan photo with normal camera. CamScanner now also support to import a picture from Gallery, and turn it to a beautiful scanned page. The option for importing a page from Gallery is shown bellow:
(See Fig. 42).
 |
| Fig. 43 |
8:- Uploading it to Internet:
Kitaboona Blog is of everyone. So we will host your file. You can upload your file HERE.
You file will be access to everyone, and everyone will download from our Blog.
If you scan one book. We will make your profile HERE. You will treated as our contributor. You contribution will make this blog to help more and more people to get benefit from. You can upload as many books as you want. You Contribution Rank will be updated HERE
Your contribution is must in this blog. But please if you want to scan a book. Please search it on Google first.
Please if you have some historical books. Don't hesitate to scan it.
=================
2:- How to Scan Books with help of DSLR Camera:
So I myself love to scan books with the help of Digital Camera (Power Shoot, DSLR). As it is not so much time consumable, and also the results are so great. I love this method. Hope you all will also like this.
How to:
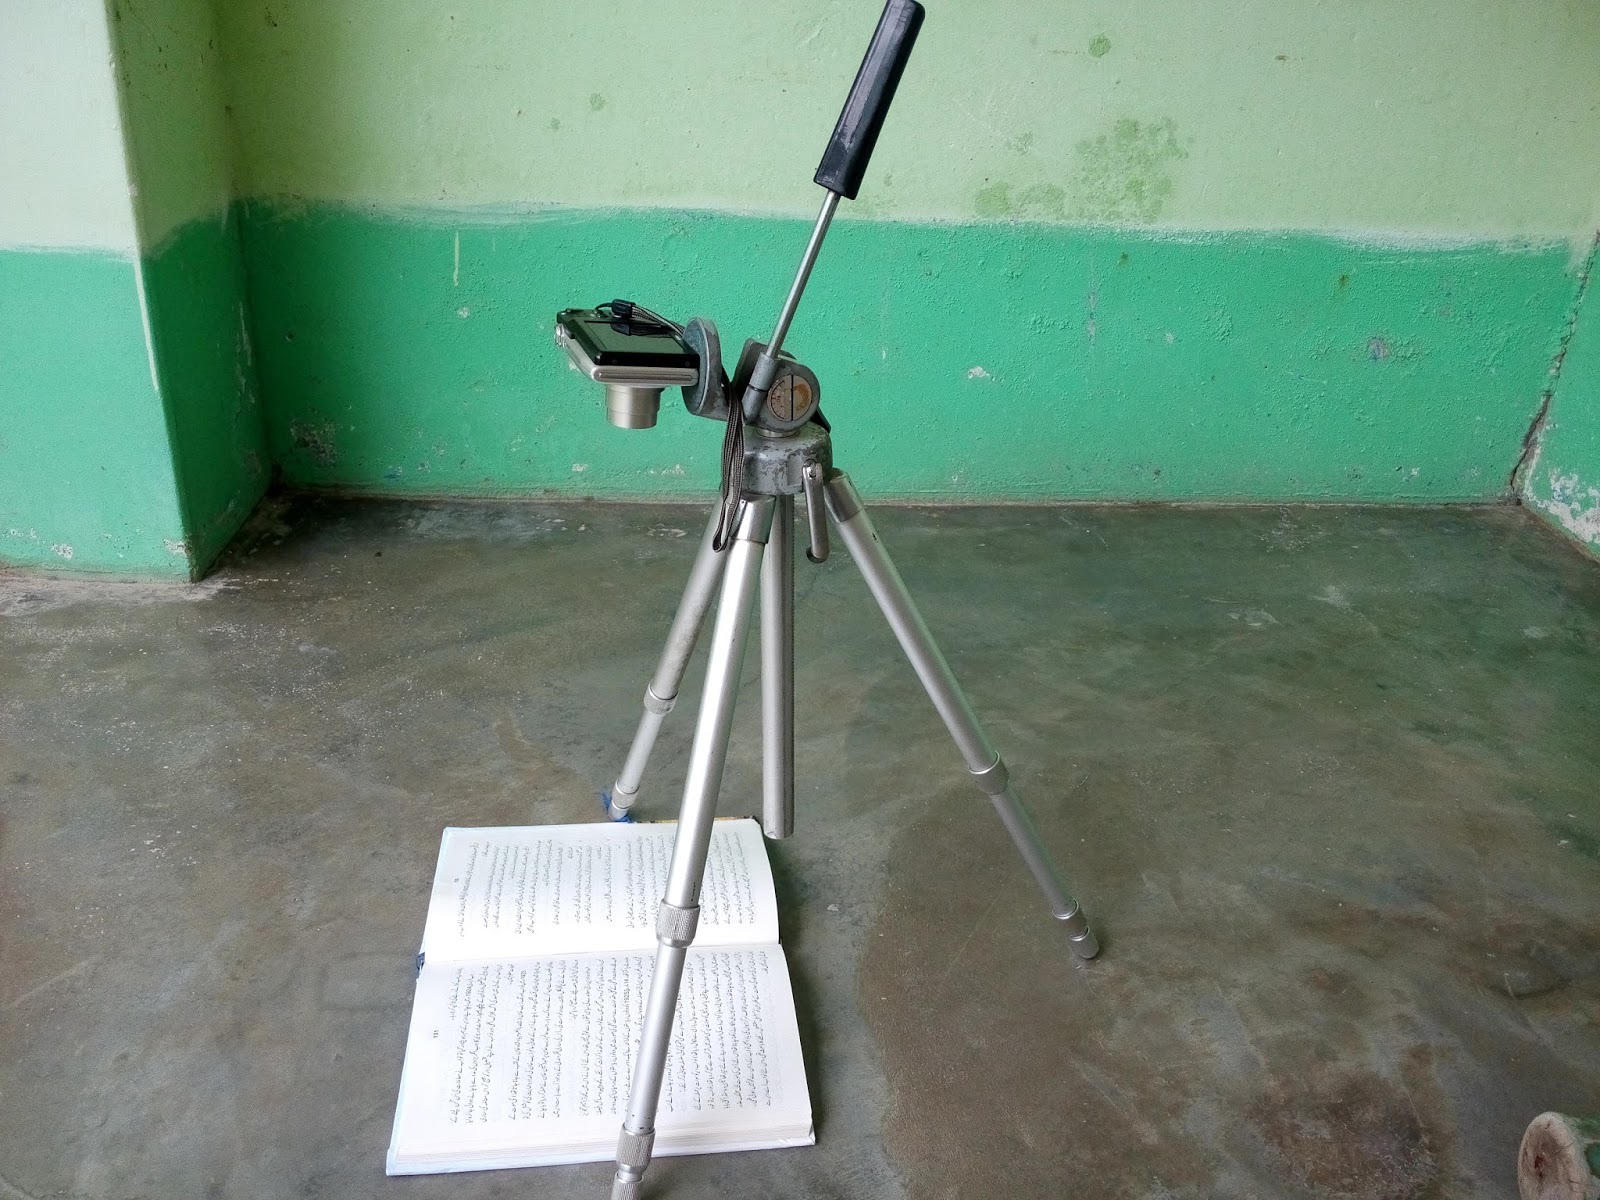
1: Take a book, place it on ground.
2: Fit your Camera with Stand or any type of, which support the camera. Support will reduce the blur.
3: Make sure lightening goes very suitable on paper.
4: Now Capture images one by one start from Cover Paper to Back Paper. Don't allow paper to displace but support it with hand or place some kind of weight, in order it doesn't move. Because when it moves, and you capture that image, you will found blur, which is a bad experience.
5: After capturing all the images. Copy all images from Camera to Desktop Device (Desktop, Laptop) either by cable or with the help of memory card.
6: Now verify all the pages, if any pages is duplicate, delete it. if any page is missing, try capture that page, and paste it to computer.
The setup of mine seems somehow like this: (Fig. 44a,b,c)
 |
| (Fig. 44a) |
 |
| (Fig. 44b) |
 |
| (Fig. 44c) |
Result seems like this:
(Preview)


(Click to zoom)
==============
7: So now the real game begun. From now on every thing is easy and can be done easily. If you like, you can zip all the images and send it to us by uploading HERE. or you can do it by your own, as I am guiding you bellow:
You will need 3 Software:
Download above Tools/software and Install it.
8: Open and Run ScanTailor Software. Open all the images in it. You are lucky because we have the following Video:
How to Scan Books
Posted by Kitaboona on Tuesday, July 21, 2015
9: When ScanTailor save all images. We have a problem. Because scan Tailor is meant for Left to Right Books like English. When it split pages it gives wrong numbering to Urdu or Pashto book (Its okay if you are scanning English books, there is then no need for this step). ScanTailor save images like this: img2, img1, img4, img3, img6, img5 . . . Which is wrong. All we need is: img1, img2, img3, img4, img5... (img is just a name before a number).
So I have found a way how to sort this out.
10: Open Bulk Rename Utility. Which looks like this:
(Fig. 45)
 |
| (Fig. 45) |
Drag and Drop all the images to Bulk Rename Utility.
(Fig. 46)
 |
| (Fig. 46) |
Now here is a trick. You see DSCN is my camera name and 1L & 2R these are two splits pages of one. So we need to inverse this. We can do this by Renaming.
Replace 1L with 2B (Fig. 47)And
Replace 2R with 1A
 |
| (Fig. 47) |
Select all the image by clicking on one and then pressing Ctrl+A. You can see New Name (Tab), this is actually a preview of your changed name.
Click on Rename Button.
(Fig. 48)
 |
| (Fig. 48) |
(Fig. 49)
 |
| (Fig. 49) |
(Fig. 50)
Note: It is a best practice that you take a backup of your images. May be you copy and paste this folder to other location before Renaming it. Because you can do any harm to you files. Which will then unable to Undo.
 |
| (Fig. 50) |
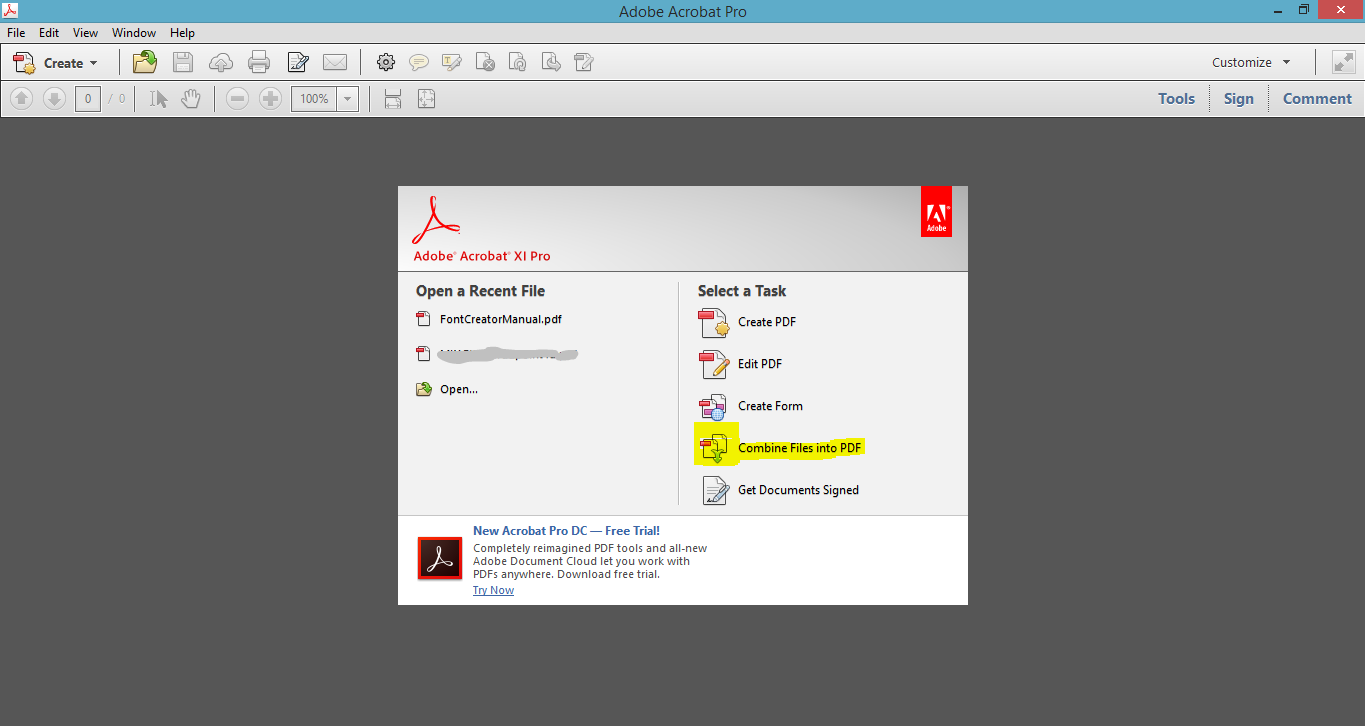
11: Finally open & run Adobe Acrobat XI. Which looks like this:
(Fig. 51)
 |
| (Fig. 51) |
(Fig. 52)
 |
| (Fig. 52) |
Click on Combined Files
(Fig. 53) |
| (Fig. 53) |
Processing...
(Fig. 54) |
| (Fig. 54) |
(Fig. 55)
The File will be save as YourBookName.pdf , PDF is a format of E-Book.
 |
| (Fig. 55) |
=================
That's it.
That's it.
Tips:
- Now you need to open a book. You must have moderate light, not very dark not shinny. Light on book must be continues. Like all paper of page must have equal amount of light.
- Your mobile must have a better resolution camera. The more resolution the more it have clear image.
- On contrary the more you have higher image the greater you have size. Which is bad in sense of PDF. So try not to exceed from 5MP.
- Upon processing different mobile acts different. I prefer iPhone 4s and Higher. Samsung also works great. But image size of Samsung often get very high size. The Kernel and operating system of iPhone is well optimized and take a very little time in scanning and processing.
- Don't use flash when scanning. It will not only damage the scan results but also camera LED. So better to scan in moderate light.
- If you are scanning Book. Try to Scan with BATCH MOOD (As there are two moods in CamScanner, One is Single Mood. Other is Batch Mood). Batch mood offers you to scan multiple pages in seconds After that you can easily crop images. And set it as you want. (I have discussed Batch Mood earlier See Fig. 23).
Hope you like this tutorial.
I am hoping to extend it by adding more options to it.
If you didn't get any point, please comment bellow, or contact me HERE.
(I will update this tutorial soon. I will show you how to get professional results like we have in this blog. It involves may tools like PhotoShop, Acrobat, NAPS2, ClearScan, ScanTailor, gImageReader, some photo compressors, and arrangers. Will show you InshaAllah)
This tutorial is written specially for members of Khan Shaheed Library
Fawad Iqbal
 Posted in
.JPG)


.JPG)
.JPG)
.jpg)
.JPG)


0 comments:
Post a Comment